In this tutorial, we will learn to use autofill in Excel. The major objective of the Autofill tool is convenience and saving time as it eases our tasks of rewriting similar and duplicate data manually. The autofill tool as the name suggests automatically fills the data to the adjacent rows and columns appropriately if you allow it.
Steps to use autofill in Excel
Let’s learn to use autofill in Excel and find out how it can help us ease our tasks while handling data in Microsoft Excel with the help of a few examples and supporting images.
1. Repeat data with autofill in Excel
To autofill duplicate data in multiple cells at a time, follow the steps below.
- Type the data in a cell.
- Rest the cursor on that cell’s bottom right corner until it turns into a black plus sign.
- Click and hold on to the plus sign and drag the cell down to as many adjacent cells as you want.
- Or double-click when the plus cursor appears to autofill data in a table.
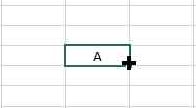
- Once you’ve dragged the cell to the adjacent cells you should see duplicate values getting copied.
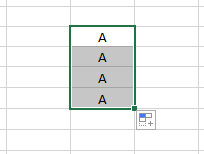
You can easily copy duplicate contents like names, numbers, dates, or any values with the autofill tool.
If formatting options such as bold, italics, or underline, etc. have been applied to a cell then you can even copy the same values to the adjacent cells without these formatting. Remember that autofill can be used to fill data to both horizontal and vertical adjacent cells in Excel.
To copy a value to the adjacent cells without formatting, follow these steps.
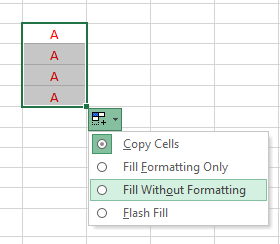
- By default, a cell value gets copied or transferred to the adjacent cells with formatting.
- You can choose to copy or autofill values without formatting.
- After dragging the values, click on the AutoFill Options icon that appears below and select Fill Without Formatting.
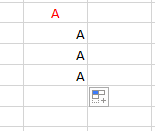
You can see that the adjacent cells have not acquired the formatting styles of the original cell value.
To apply only formatting without values, do as follows.
- Type the data in a cell.
- Rest the cursor on that cell’s bottom right corner until it turns into a black plus sign.
- Click and hold on to the plus sign and drag the cell down to as many adjacent cells as you want.
- Or double-click when the plus cursor appears to autofill data in a table.
- After dragging the values, click on the AutoFill Options icon that appears below and select Fill Formatting Only.
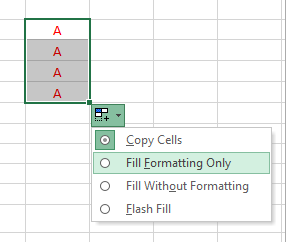
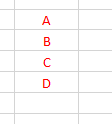
You can see that all formatting styles of the original cells have been carried forward without its values. All random entries made in those cells have acquired the styles of the original cell.
Note: B,C, & D are manually written to show fill formatting only option.
2. Using autofill in Excel to make series of entries
Autofill is not just used to ‘copy’ an entry to the adjacent cells but can be used for a variety of different tasks as per your requirements. Let’s learn how it can be used to make a series of data.
To make a series of entries, do as follows.
- Type the first two data in the series.
- Select both the cells.

- Rest the cursor on the second cell’s bottom right corner until it turns into a black plus sign.
- Click and hold on to the plus sign and drag the cell down to as many adjacent cells as you want.
- Or double-click when the plus cursor appears to autofill data in a table.
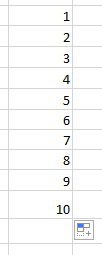
- Show the differences in the first two cells to arrange the series in that manner. Notice that we have provided a difference of 1 unit between two cells. The autofill tool will subsequently fill the latter series within a difference of 1 unit.
3. Using autofill in Excel for date and time entries
Autofill can be used to fill date and time entries in Excel. Let’s learn how.
We have a date written in a cell below in the image. We can autofill to fill the upcoming dates in the adjacent columns.

- Rest the cursor on the second cell’s bottom right corner until it turns into a black plus sign.
- Click and hold on to the plus sign and drag the cell down to as many adjacent cells as you want.
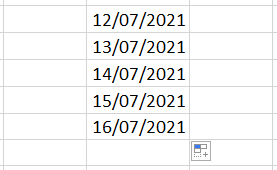
You can see that future dates have been applied to all adjacent cells automatically.
Let’s try to autofill the time series in Excel now. Here is an example.
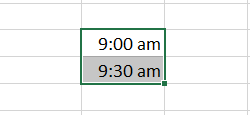
Show the differences in the first two cells to arrange the series in that manner. Notice that we have provided a difference of 30 minutes between two cells. Autofill in Excel will subsequently fill the latter time series within a difference of 30 minutes.
- Select both cells with time.
- Rest the cursor on the second cell’s bottom right corner until it turns into a black plus sign.
- Click and hold on to the plus sign and drag the cell down to as many adjacent cells as you want.
- Or double-click when the plus cursor appears to autofill data in a table.
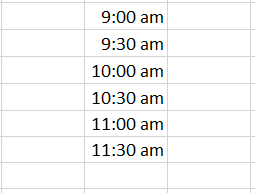
You can see that the series has been filled by the tool in the adjacent cells.
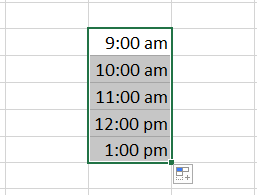
- As a default behavior, autofill in Excel employs a difference of 1 hour between time if not given any time data in the second cell. Take a look.
- Autofill can be used in the same way for year series too. Take a look at the multiple examples given below.
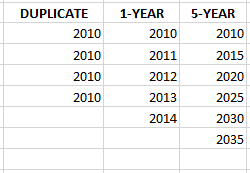
Similarly, for date and time series, autofill can be used to fill quarter series, 5-year period series, month series, days of the week series, etc.
4. Using autofill in Excel to fill formulas
Let’s see how we can use the autofill tool to fill formulas in multiple cells.
We take an example of a student mark list for which we will use the SUM function to find out the grand total of each student’s total marks. Here are the steps.

- Apply the SUM function for the first student.
- Drag the cell down to the adjacent cells below to apply the SUM function for all the students.

You can see that the SUM function has been applied for all students and the grand total for all students has been calculated automatically by autofill. This tool can be used on most of the formulas that are expandable to multiple cells. Formulas like the TRANSPOSE function are an exception to this.
Learn about the TRANSPOSE function in Excel in detail here!
Conclusion
This article was all about the different ways to use the autofill tool in Microsoft Excel for different kinds of data values in the application. Feel free to comment below if you have any doubts regarding the autofill tool in Excel!
Reference: Microsoft
