Spreadsheets are the medium to pile up tonnes of data. But for what use the data might be if we cannot interpret them to deduce some meaningful inferences?
That’s where the most needed in-built function of MS Excel kicks in! – The FORMULA. In this article, we would be looking into the techniques on how to put these formulae into use.
Locating the Formulas Tab in Excel
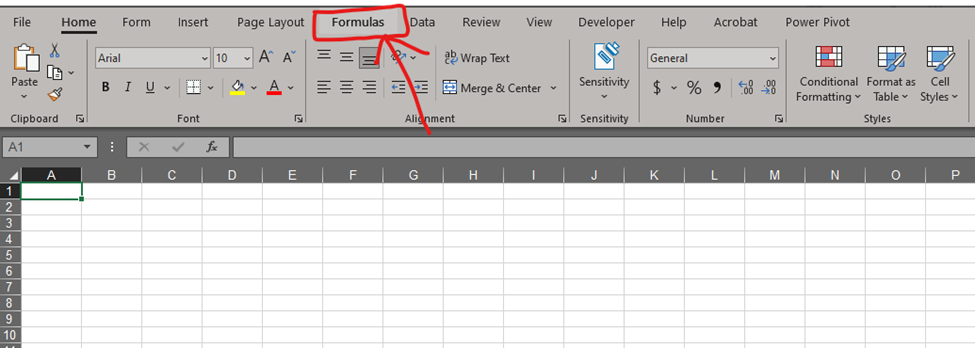
Let’s get started with locating the tab within which formulae from a diverse set of categories are present. The Formulas Tab lies on the list of Tabs positioned adjacent to the Page Layout Tab as shown in the below image.

Once we click on the Formulas tab, all the inbuilt formulae in MS Excel are grouped into the following categories,
- Recently Used
- Financial
- Logical
- Text
- Date & Time
- Lookup & Reference
- Mathematical & Trigonometrical
- More Functions
All the above-mentioned categories are self-explanatory and can be seen in the below image.

Constructing a Formula
Even a simple arithmetic calculation such as adding two numbers cannot be done in MS Excel if we type the formula as shown in the below image.

If anyone types two numbers with the PLUS (+) sign in the middle & hit ENTER, the contents stay as is & MS Excel doesn’t display the resulting number.
So, what’s the missing piece of the puzzle?
What’s with the bar which is indicated by fx that displays the same contents as in the cell?
The missing piece is the EQUALS (=) sign & the bar indicated by fx is called the Formula Bar. It gets its name owing to its inherent capability to display the formula entered within the selected cell.
We shall try doing the same operation in the previous image, but only by starting with an EQUALS (=) sign, the result would be similar to the below image.

There would be a striking difference between the contents of the cell displayed in the formula bar & that which is displayed directly on the cell, in this case, thereby bearing a strong reason behind the naming of the Formula Bar.
After establishing the importance of starting with an EQUALS (=) sign, now let’s transcend into understanding the basic building units to construct a formula. Any in-built formula in MS Excel follows a template for being put into use. This template is called Syntax.
= formula name (instruction 1, instruction 2,…………..)
The above statement is a general depiction of how all the formulae in MS Excel are being constructed. Let’s have a look at constructing an IF statement to confirm whether this general depiction holds good.
Example: IF Statement
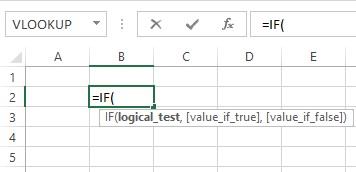
We start by using an EQUALS (=) sign, type IF, followed by an opening bracket, the following syntax would be displayed in the recent versions of MS Excel (God bless its UI!).

The syntax for IF states that the first one has got to perform a logical test. For simplicity, let’s assume that the logical test is a simple comparison to find out the greater (>) or lesser (<) between 2 cells & depending on the outcome, we ask MS Excel to carry out a specific task – one when the condition given in the logical test turns out to be true & the other when it is not. Following is a use case of an IF statement.

The logical test here is to find out whether the numbers under Team A (Column B) are greater than the numbers listed under Team B (Column C). If it turns out true, Excel would display Team A wins within the cell in which the formula is typed in. Else, it’d display Team B wins within that cell. Now, the closing bracket is put in place & the formula is applied to other cells as well.

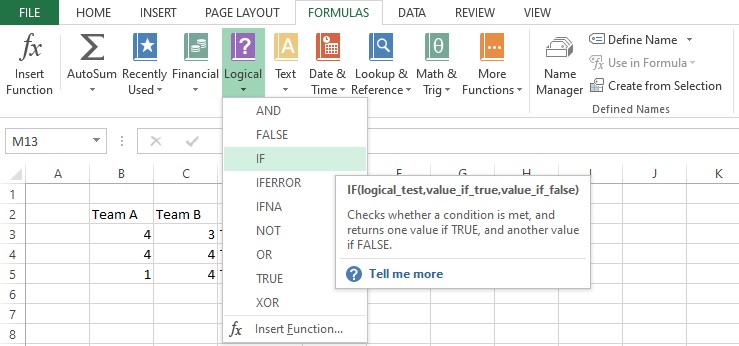
The IF Statement can also be applied to any cell by selecting it from the Formulas Tab as shown in the below image, rather than typing it. (But, typing a formula makes you look cool!)

Conclusion
So, there we are having successfully compared the generic depiction of a formula’s syntax with that of the IF Statement. QuickExcel has numerous other articles too which could help you and here’s one dealing with adding numbers in MS Excel right now. Cheers!
