There are various websites and apps which provide us Market Data for all the securities, and commodities traded in the stock market. But it would be very handy if we could get all this data directly into our Excel Workbook. This would help us for better calculation, analysis, and visualization of the data, in form of tables, charts, and graphs.
Excel provides us with the feature to fetch and display the latest stock market data easily with built-in tools.
In this tutorial, we will guide you step-by-step, so you can easily fetch stock market data in your Excel sheet.
What Stock Market Data can be fetched in Excel?
Excel’s built-in ‘Stock Market’ tool supports many data parameters which can be fetched directly. These parameters are listed below:
| 01. 52 week high | 02. 52 week low |
| 03. Beta | 04. Currency |
| 05. Change | 06. Change (%) |
| 07. Change Extended Hours | 08. Change (%) Extended Hours |
| 09. Name | 10. Description |
| 11. Official name | 12. Exchange |
| 13. Exchange abbreviation | 14. Headquarters |
| 15. Industry | 16. Instrument Type |
| 17. Employees | 18. Last traded time |
| 19. Market cap | 20. Ticker symbol |
| 21. Open | 22. Close |
| 23. High | 24. Low |
| 25. Price | 26. Previous Close |
| 27. Price (Extended Hours) | 28. P/E |
| 29. Shares outstanding | 30. Volume |
| 31. Volume average | 32. Year incorporated |
Important Points to Note:
- You need to have an active Internet Connection to fetch data directly into your Excel sheet.
- Disclaimer: Financial market information is provided “as-is” and not for professional or trading purposes or advice.
Steps to fetch Financial Market Data in Excel
Let’s get started with using the Stock Market Data add-in to pull stock market data in Excel
Step 1. Organize the Data – Ticker Symbol
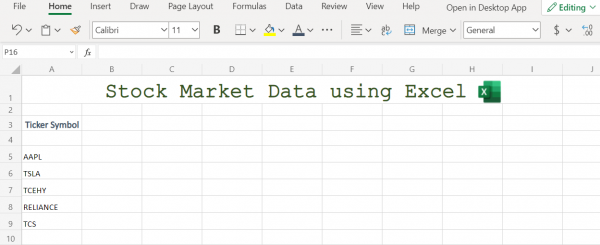
Type the particular Ticker Symbol or company name for which you want to fetch data
Note: We are here using the Ticker symbol and recommend you to do the same, because they are easy to write and also gives less possibility to error as compared to entering the company name

In our example above, we are finding financial data of these companies, traded on different exchanges across the globe —
- AAPL – Apple Inc.
- TSLA – Tesla Inc.
- TCEHY – Tencent Holdings Ltd.
- RELIANCE -Reliance Industries Ltd.
- TCS – Tata Consultancy Services
Step 2. Select Ticker and Convert To Stock
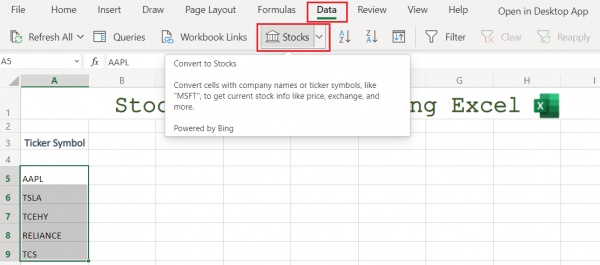
- Select the Ticker symbol or symbols to get data.
- Navigate to ‘Data‘ in the above tools tab (Home tab)

- Click on ‘Stocks‘ to convert the input ticker symbols to Stocks. [as show below the Excel will automatically convert and map the data to the exchange which is most popular in case of multiple exchange trading/listing]

Unable to convert to Stocks
In case, after following the above step, your ticker symbol wasn’t converted to stock, it’s likely because the stock is registered on multiple exchanges. In this case, you see an info symbol before the ticker.
Then click on the info symbol to reveal a side pop-up where you will be presented with option to select the particular exchange.
Step 3. Select the Stock parameter for Data
- Excel supports various Finance Market data parameters to select from, which are shown in the above table here.
- To select particular data parameter like High, Low, Volume, Price, etc.
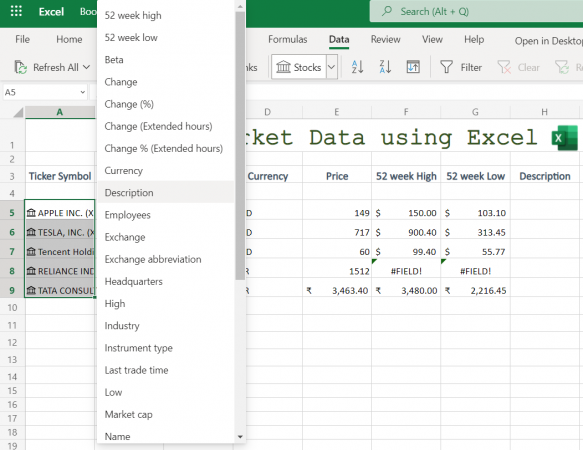
- Select all the ticker symbols (converted to stocks) and on hovering over them you will be presented with a symbol of data (of somewhat like a book)
- Click on the icon and select the parameter you want to fetch data of.

Final Sheet with all the required data. [You may choose any number of data parameters as per your requirement]:

You may notice in our above example that 52-week high for Reliance is given as #FIELD! – this means that Excel built-in tool cannot fetch data for this particular field. You can verify if the stock ticker is right or if you need to add the exchange information before the ticker symbol by going through the data that Excel has on your market.
Conclusion
That’s It! You can get Finance or Stock Market data in various parameters easily by following the above step-by-step procedure now in your Excel sheets.
We hope you learned and enjoyed this lesson and we’ll be back soon with another awesome Excel tutorial!
