Excel ensures a smooth transition for inputting and saving data, for example, Contact lists with columns and rows, sorting capabilities, and data entry tools. Once you’ve built a thorough list, you may utilize it with other Microsoft 365 products to do a variety of activities. Using Word’s mail merge function, you can print mailing labels from Excel in a couple of minutes.
Steps to Print Mailing Labels in Excel
Follow this step-by-step tutorial to print mailing labels in Excel easily.
1. Enter the Required Data in an Excel Sheet
You may safely skip this test if you have already built a mailing list in Excel. If you haven’t already made the list, we still advocate using it because it’s better for organizing and storing data than a Word table.
- The first step is to construct a column header that corresponds to the data in each column. Insert those headers into the first row of each column.
- The headers you add are determined by the information you intend to put on the mailing labels. Titles are usually great, but it’s critical to know which title a person goes by before establishing labels.
- Also, if your list is for corporations rather than individuals, you may skip the “First Name” and “Last Name” headers and just use “Company Name” instead. In this example, we’ll use a personal email list to fully demonstrate the procedures.
In the first cell of each column, provide a heading that describes the data. Create a column for each element that you wish to see on the labels.
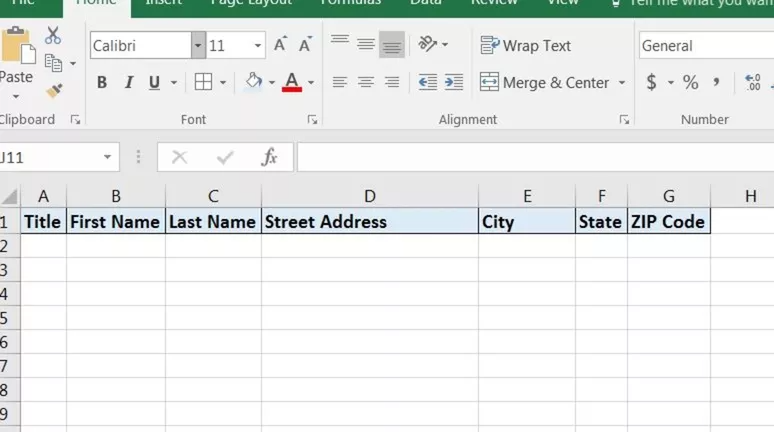
- Fill in the blanks with the entries as names and addresses or any information you want to print on labels.
- When you’re finished, save the spreadsheet.
2. Create Labels in Word
Following that, we must select the size and type of labels we want to print. We turn to Word for this step:
- Create a new Word document.
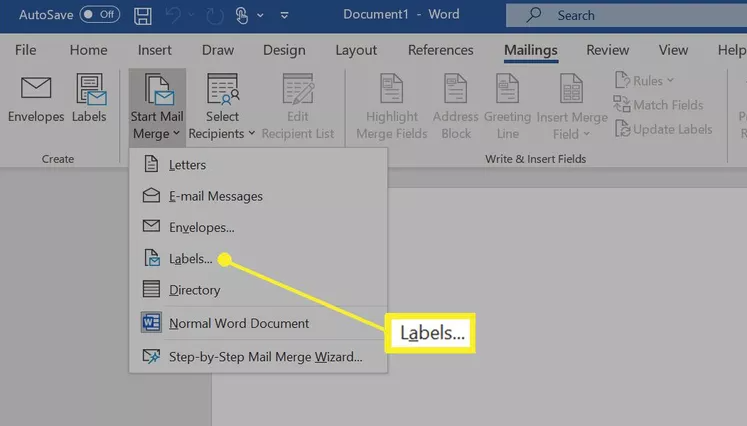
- Navigate to the Mailings tab.

- Select Start Mail Merge > Labels from the drop-down menu.
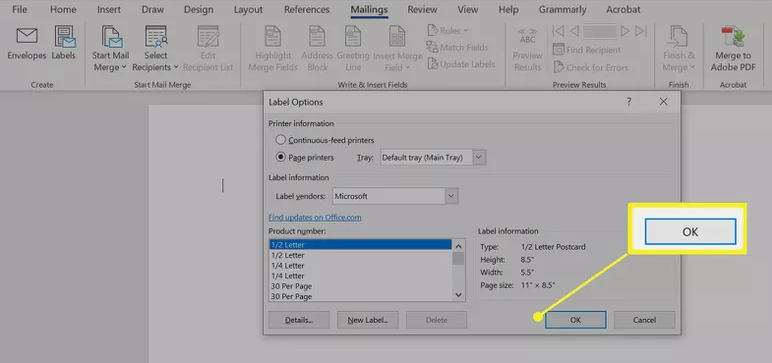
- Select the brand from the Label Vendors box, followed by the product number from the Product Numbers list. If you wish to input custom label dimensions, choose New Label.
- Once you are prepared to continue, click OK.
3. Connect the spreadsheet to the label
We need to link the Word document to the spreadsheet holding our list before we can execute the merging to print address labels from Excel.
When we connect to an Excel worksheet from Word for the first time, we must activate an option that allows us to convert files between the two applications.
- Click the File menu in Word.
- Look at the bottom of the left window and click Options.
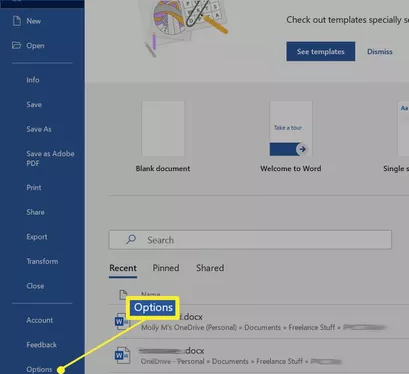
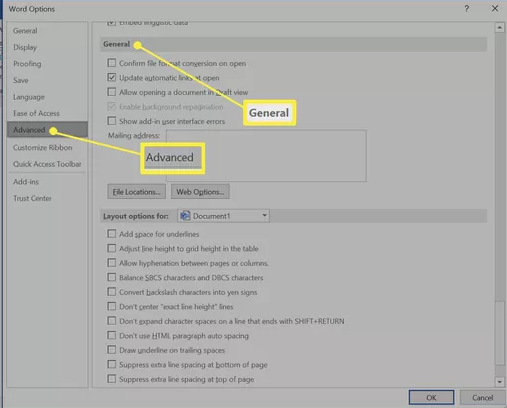
- Scroll to the General section after clicking Advanced in the left pane of the Word Options box.
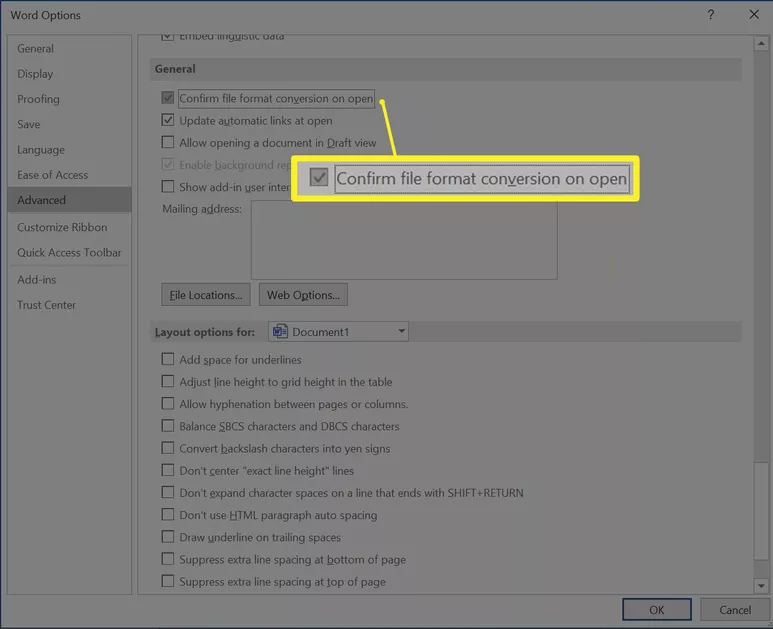
- Check the box next for confirming file format conversion on open and then click OK.
- Now, go to Select Recipients > Use an Existing List from Mailing’s Start Mail Merge group in the top main row.

- In the Select Data Source window that appears, navigate to the Excel spreadsheet containing your list and click Open.
- Click OK to indicate that you wish to utilize the list, then OK again to choose the table that contains your list. The page will now be filled with «Next Record» labels.
4. Insert Mail Merge Fields and Run the Merge
After you’ve structured the data, you’ll need to add mail merge fields before the merging can be completed. This is when the headers you created in your Excel spreadsheet will come in help.
- Select Address Block in the Write & Insert Fields area of the Mailings tab after clicking on the first label on the page.
- On the Insert Address Block dialogue box that opens, click the Match Fields button.
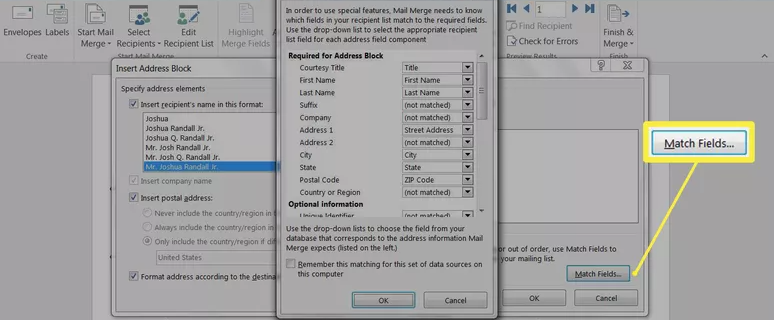
- Click the OK button. To exit the dialogue window, click OK once again.
- Choose Mailings > Fields to Write & Insert > Labels should be updated.
- Once you’ve set up the Excel spreadsheet and Word document, you may combine the data and print your labels.
- On the Mailings tab, under the Finish group, select Finish & Merge.
- To see a sample of how your printed labels will look, click Edit Individual Documents.
- Choose All > OK.
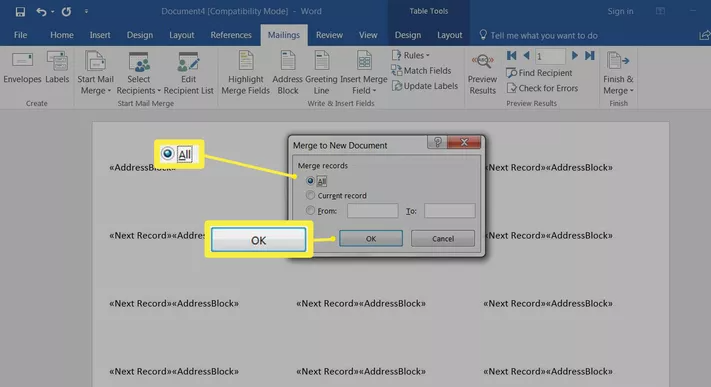
- A document containing the mailing labels using our Excel spreadsheet opens. The labels may be edited, printed, and saved just like any other Word document.
Conclusion
That’s It for the tutorial! Hope you have learned about printing mailing labels in Excel and can now easily perform it on your spreadsheet.
