Want to learn how to insert and remove page breaks in Excel? If you want to print your excel sheet, it divides into pages automatically if your data is large. This is done by Excel, by inserting page breaks in between the sheets.
However, the page breaks that Excel inserts by default are based on scale options like margins and paper size. It would be much more convenient if the user decides where to put these page breaks or remove them if needed.
Suppose, you are making a list of revenues collected by 60 workers in four months. And you want to print the sheet. Excel will divide the content into pages depending on the page scaling. Now, you want to print exactly 15 individuals on one page and then next and so on. This can be done by placing the page breaks manually.
Preview the Page Breaks in Excel
By default, the Page break initiated by Excel is shown as a dotted grey line on the sheet. However, you can highlight the page break line by changing the view.
- Go to the ‘View’ tab in the header menu.
- You will find the ‘Workbook views‘ section on the top right corner of the screen.
- Click on the Page Break preview.

Now you can see the contents that are printed on the first page, second page and so on.
Inserting Page Breaks in Excel
Suppose, you have made a list of 20 workers in a factory and their revenues collected in five months for each worker (an excel sheet is displayed below for your reference) and you wish to print this sheet.
Now, all the entries will be printed on the same page because the data is not large enough. But you want to print exactly 10 individuals on the first page, this can be done by inserting a horizontal page break.
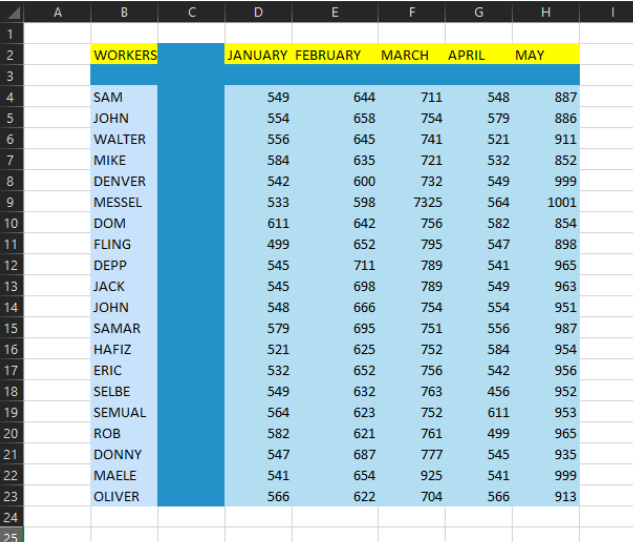
Note: The page break works with top and left preference. So, if you are inserting a page break at row 18, then the break-line will appear between rows 17 and 18. The contents from row 18 will be printed on another page. In the case of columns, suppose you select column E, then content till column D will be printed on a separate page, and so on.
1. Horizontal page break
To print the 10 individuals on a page, we have to insert a horizontal page break between rows 13 and 14 since we have 2 rows on the top with the header and a blank one. See the steps below to add page breaks in Excel:
- Select row to insert page break by clicking on the row number.[we have selected 14 as per our example]
- Click on the ‘Page Layout‘ tab.
- In the Page Setup group click on the ‘Breaks’ option.
- Now confirm by selecting ‘Insert Page Break’.
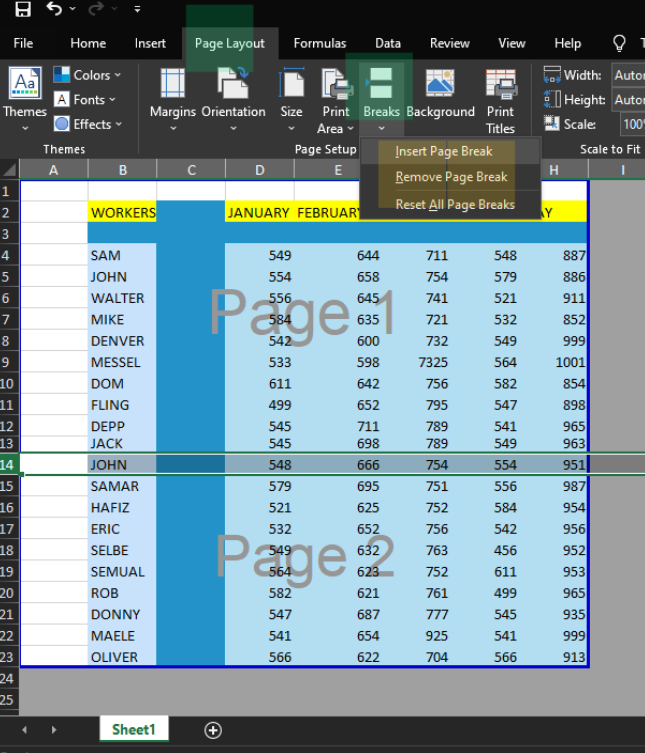
On doing this a page break will be inserted between rows 13 and 14 in our sample sheet, as shown above.
2. Vertical Page Breaks in Excel
Similar steps are done to insert a page break between columns. Suppose you have to insert a page break between columns D and E. See the steps below:
- Select column E by clicking on the column number.
- Click on the Page Layout tab.
- In the Page Setup group click on the Breaks option.
- Now click on the Insert Page Break.
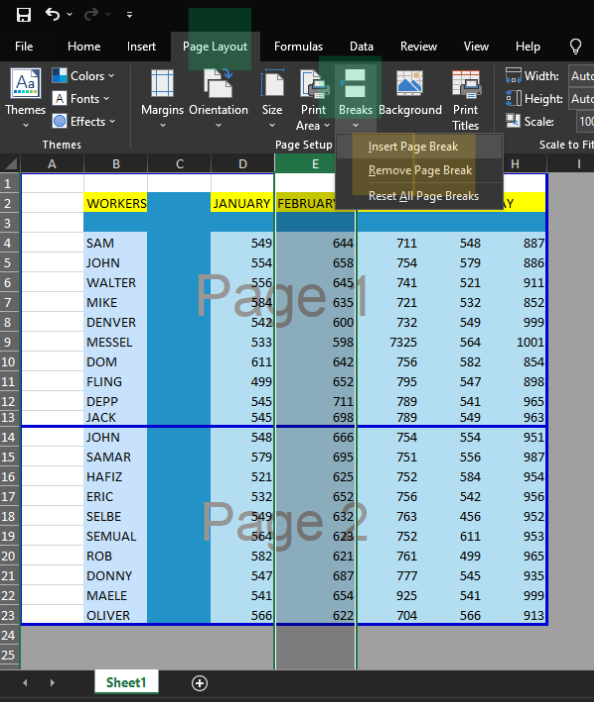
On doing this a page break will be inserted between the column D and E.
Note: You can also insert a page break using a keyboard shortcut. The shortcut to insert page break is Alt + P + B + I
Removing Page Break in Excel
A similar algorithm is used to remove the page break(horizontal/vertical). Suppose we have to remove the horizontal page break we placed between the 13th and 14th. To remove page break a step-by-step tutorial is given below:
- Select the row of page break by clicking on the row number.[selecting 14, as per our example]
- Click on the ‘Page Layout‘ tab.
- In the ‘Page Setup‘ group click on the ‘Breaks’ option.
- Now select the ‘Remove Page Break’ option to remove the page break.
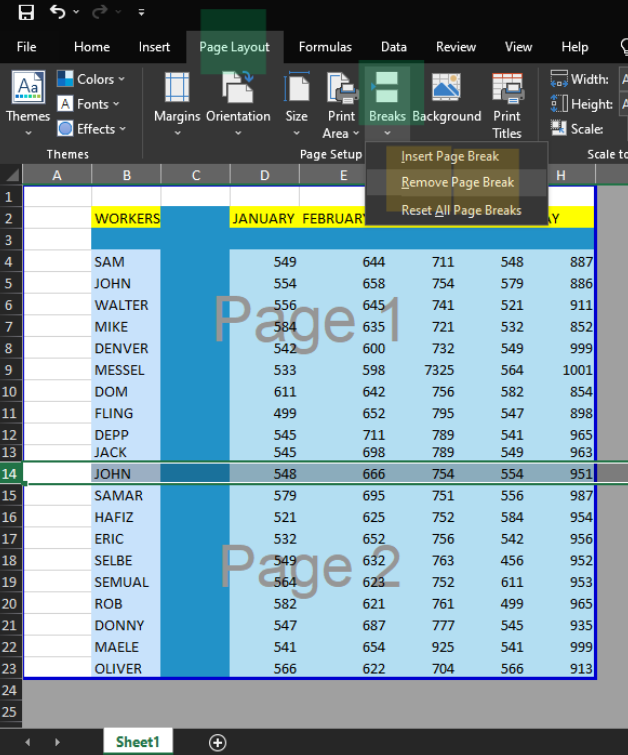
Similarly, we can omit a Vertical Page Break by selecting the column next to the break line and repeating the above steps.
You can remove one page break at a time using the above method or all at once by resetting the page breaks in the ‘Page Setup’ group. But you can not omit multiple page breaks simultaneously.
Note: You can remove a page break using a keyboard shortcut. The shortcut to insert page break is Alt + P + B + R.
Moving Page Breaks in Excel
You can slide the page break line manually to your desired place. Follow the steps below:
- Go to the ‘Page Break Preview‘. The steps for doing it are discussed above.
- Move your cursor to the thick blue break lines. Your cursor will transform into a double-headed arrow.
- Press the Left key of the mouse and drag the break line to your desired place.
- A new page break will be inserted into your spot removing the older one.
Hide or Show the Page Break line in Excel
You can hide the page break line if you want. Go with the steps below:
- Go to the ‘File’ tab and click on it.
- Click on the ‘Options’.
- You will be redirected to the ‘Excel Options’. Click on ‘Advanced’.
- Now scroll down to the Display options for the worksheets.
- Uncheck the ‘Show page breaks’.
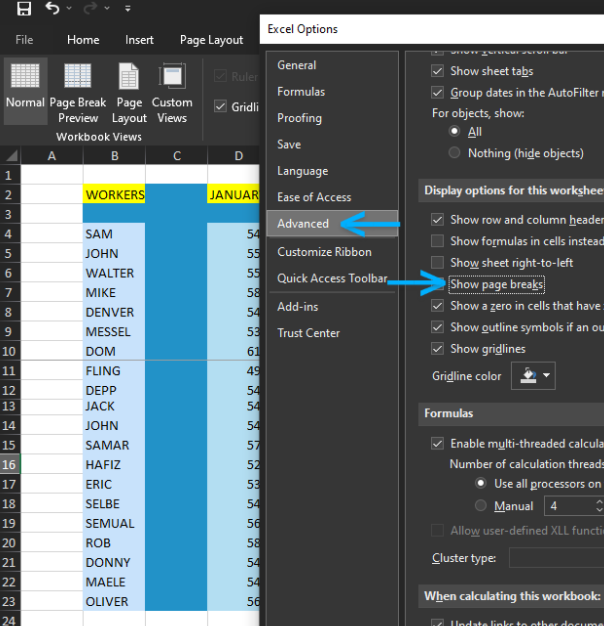
Doing this will hide the grey page break lines. Though the break lines in the page break preview will still be visible. Moreover, the page break lines are hidden for this workbook only. You have to repeat the steps again for another workbook if you are willing to hide the break lines there.
Conclusion
Hope you have learned well how to insert or remove page breaks in Excel. For more tutorials on Excel, check out quickexcel.com.
