There are multiple reasons why you would like to export data from Excel to Word. Even though there are a lot of sites where you can easily upload your excel files and easily get converted word documents but sometimes that also doesn’t work. Indentations get changed and the data got jumbled which makes the work more hectic to work on re-edit, so better do itself for no loss of data.
Steps to Export Data from Excel to Word
The simplest method to export your excel data to word document format is to use the copy and paste method. Excel datasets contain large amounts of data, graphs, and various tabulated data, etc. Sometimes easy copy/paste is, tricky task to do, so by keeping all data analytics in mind let’s start with basics:
Method 1: Copy-Paste from Excel to Word
- Open your Word and create a new file (word document)
- On the other hand, open your Excel data file and now select the cells (data) by holding your Cursor [left-click] and drag till that area from where to where you want to copy the data.
- Now after selecting either you press ‘Ctrl+C‘ to copy or just on top next to the home you will find ‘Copy‘ button, press it to copy the selected data.
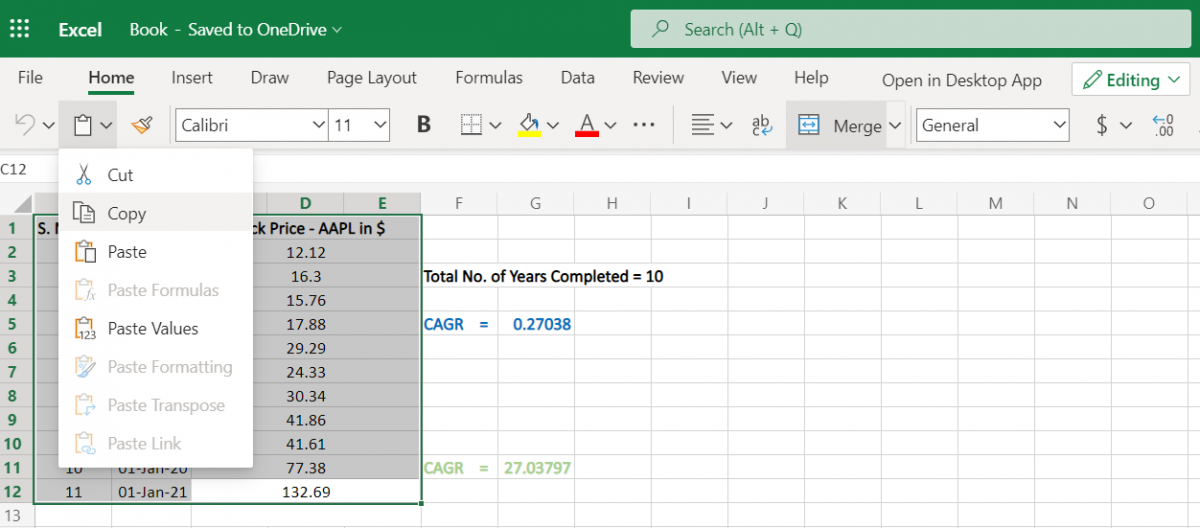
In our above example, we wish to copy ‘Historic Stock Prices of $AAPL’ and have selected the same.
- Now after copying the data, go to the word document file and paste the data by ‘Ctrl+V‘ and you will find all your data copied. There you will see some paste options.
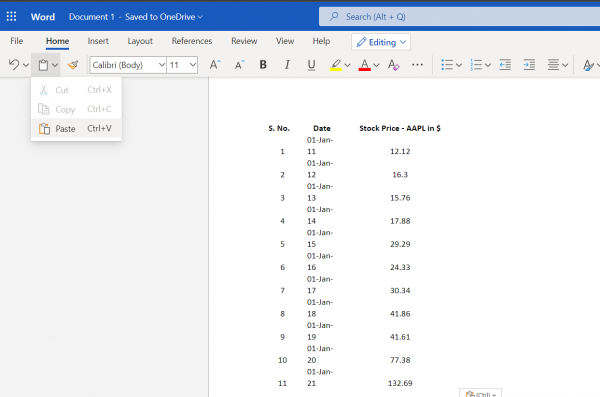
Solving the Errors while exporting data from Excel to Word
- Sometimes the copied data doesn’t show the tables or rows or columns[as in our above image example].
For correcting it, right-click and select paste option and you will find different options. The default option 1st option (Keep Source formatting) now you need to change paste option and select 2nd option(Match Destination Table Style).
This option will help you in having all your data as in excel tables, rows, and columns all will be displayed after this (Match Destination Table Styles) option is selected.
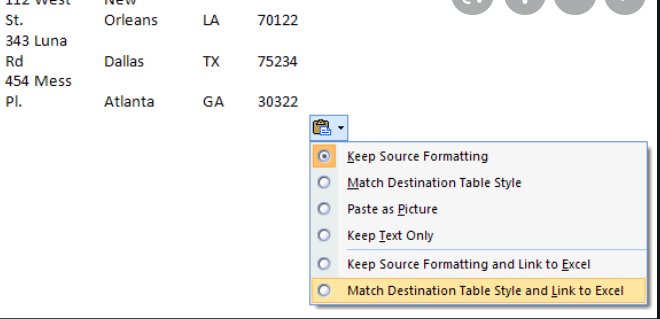
- The 3rd option (Paste as Picture) under paste option, will help you in image copying whenever you copy some graphs or data modes or histograms, this will let you enable the options for editing, resizing, and changing its preview.
NOTE: If you frequently use a paste option that is not Keep Source Formatting, you can click the Set Default Paste option and change the default settings in the Cut, copy and paste a section of Word Options. So that your data indentation doesn’t get changed.
What to do if the paste does not work?
Sometimes paste options aren’t visible under the paste section, at that time just follow these steps:-
- Open your word, on the top left corner you will find ‘FILE‘.
- A new pop-up page will be shown, on the left-hand side, you will find word options.
- On opening the word option, go to advanced settings and there you will cut, copy and paste the section.
- Under this option, you have to enable the show paste option after you do that all paste options will start showing.
Method 2: Excel to PDF and PDF to Word
- Download any PDF viewer in your system or, use the pre-installed viewer (if any).
- Now save your Excel file in the format of *.pdf (note the extension) file.
Recommended Read: How to Convert Excel to PDF
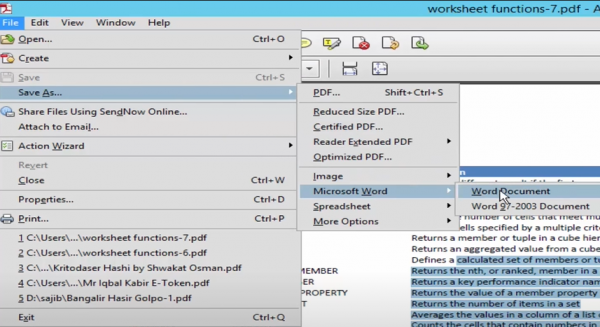
- And now again go to your file menu and click save as (under save as), select the option word document. (as shown above)
- And your file is now converted into word.
NOTE: This will only be helpful when you would like to convert your whole excel data into word.
Method 3: Inserting As Object
You can insert the excel worksheet as an object in Word, very quickly without opening excel by just following these steps:
- On performing this insertion you will only be able to insert your last active worksheet when the Excel workbook is closed as the object.
- Now open the word document, and click Insert > Object.
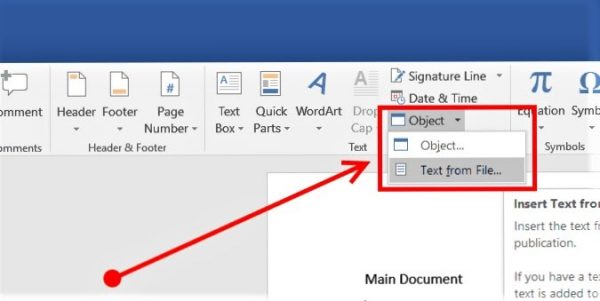
- Then in the Object section, under Create from File tab, click Browse to select the workbook you need to insert its worksheet from the Browse dialog.
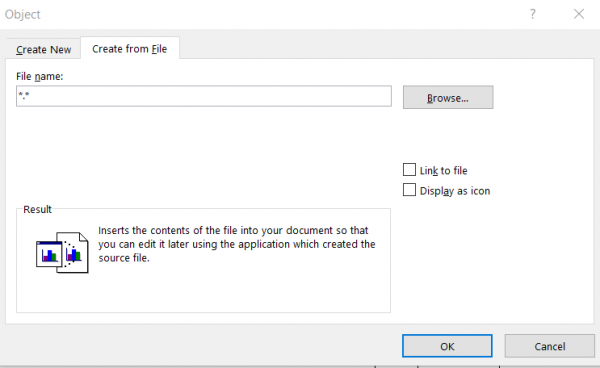
- Now click on Insert > OK to finish the operation. Now the last active worksheet in the selected workbook has been inserted as an object in the Word document.
NOTE: You can edit and format the object as you need by right-clicking on the object and selecting the option you need from the context menu.
Conclusion
That’s all there is to copy data from Excel to Word and vice versa. This process is very easy to work with. I’m sure you have already gotten a hang of this. Stay tuned for further tutorials.
