MS Excel is all about flexibility. One can add stuff, remove the added stuff, colour things, change the font size or style and the list goes on & on. It is this flexibility that has made MS Excel gain an irreplaceable position amongst the officer goers. In this article, we shall explore how to add cells in MS Excel through each of the following methods.
- Using Insert from Home Tab
- Using the Keyboard Shortcut
- The Accelerator Way
The following is the tabulation which we would be using to add new cells.
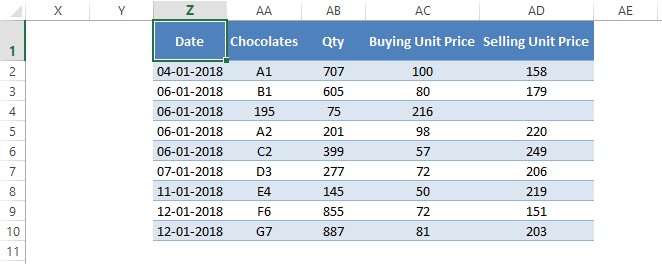
With the first look, one can identify that something is not right with the entries in row 4 & not right they are! The entries which should have been under the columns Qty, Buying Unit Price & Selling Unit Price have been misplaced one cell to the left. As a result, the entry for the column Chocolates has been replaced by that of the entry from column Qty.
So, let us correct things & put them back in the place where they belong by exercising the Insert Cells option available in MS Excel.
Method 1 – Using Insert from Home Tab:
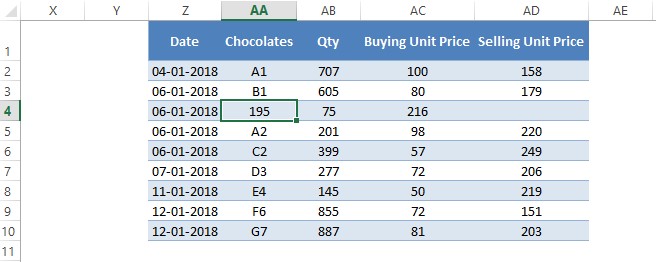
Click on the cell where a new cell is to be inserted, which in this case would be cell AA4.
Once done, it is time to swim across the ocean of options available under the Home tab until we reach Insert given under the Cells section as shown in the below image.
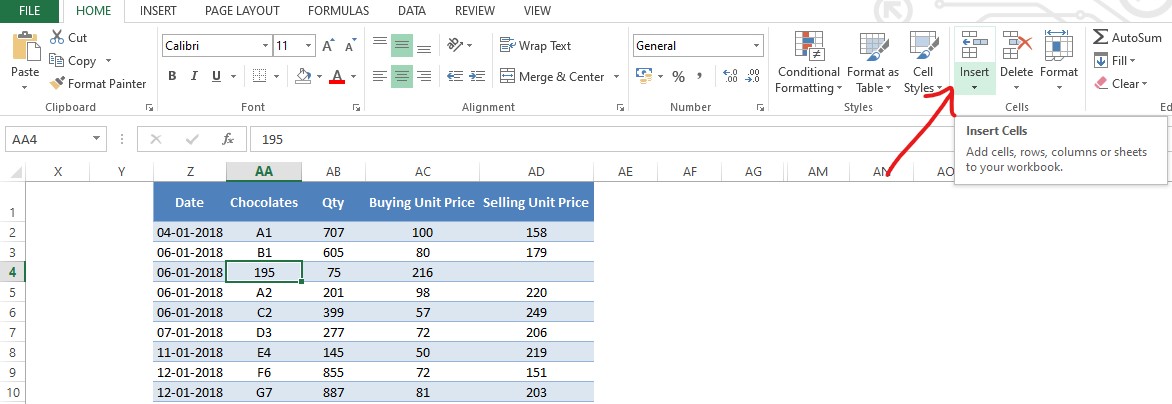
Click on the Insert option & a pallet of choices would dropdown. Select Insert Cells in that list.

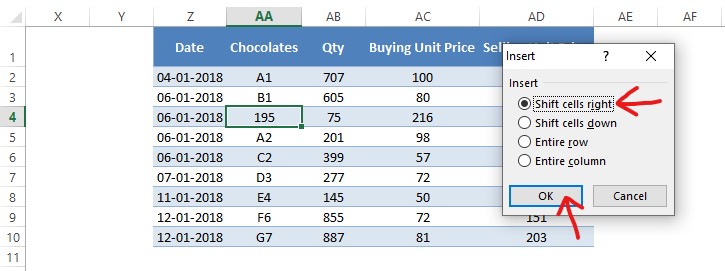
A pop-up shall appear as shown below, asking to choose the direction in which one desires to insert the new cell.
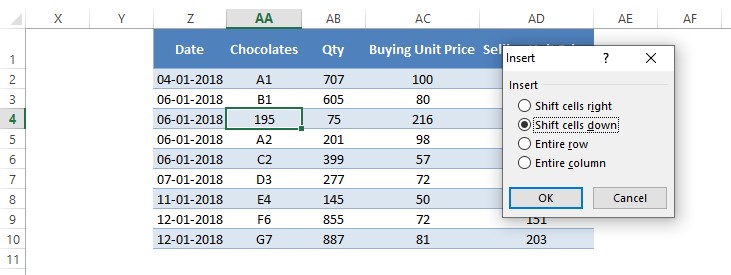
The desired direction to add the cells, in this case, would be towards the right. The default selection would be downwards, but one can always modify it in accordance with the need. Select Shift cells right & click OK.
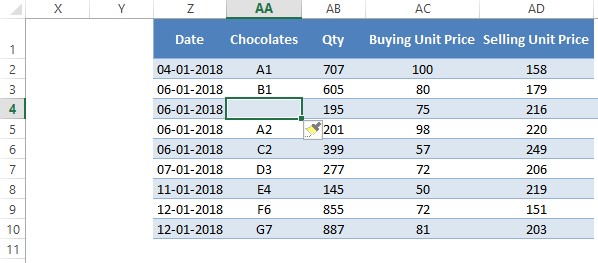
Once done, AA4 becomes blank & entries previously in its location get shifted one cell to the right along with the subsequent adjacent entries as shown below.
Method 2 – Using the Keyboard Shortcut:
CTRL + SHIFT + PLUS (+)
The above is the shortcut that is to be used & the emphasis here is to press each key one after the other, but not taking the fingers off the previously pressed key while pressing the successive key. Pressing all the keys at the same time would only render this shortcut non-functional. Once the keys are pressed with the above in mind, it directly takes us to the Insert pop-up.

The rest of the steps remains the same as that of the previous method & we shall have the new cell inserted in the place of AA4 in no time.

Method 3 – The Accelerator Way:
Here the keys are to be pressed one after the other, but it is not necessary to keep the previously pressed key still actuated as in the previous method. Rather, one can lift the finger off the key after it is pressed while one moves on to the successive key in the sequence.
ALT, I, E
The above keys are to be used to insert a new cell in the desired position. Once these keys are actuated bearing in mind the criteria stated at the beginning of this method, the Insert Cells pop-up shall appear.

The rest of the steps remain the same & once the desired direction is chosen the new cell gets added.

Conclusion:
Now we have reached the end of this article on how to add cells in MS Excel. QuickExcel has numerous other articles too that can help those who are up to get into the depths of MS Excel. Cheers!
