One of the tasks Excel can do better is to print labels. Microsoft Excel is a very useful software than we know about. This software can do a lot of things easier without any hassle.
Excel linking with Word makes it easier for printing labels, it allows users to create labels and preview them before printing. With the main merge feature in Word, it is easier to take a printout of mailing labels direct from Excel.
How to Print Labels in Excel.
Let’s see how to print labels in Microsoft Excel.
Step 1. Adding Data
- Create a new Excel file and name it as labels, open it.
- Add the data to the sheet as you want, create a dedicated column for each data like, Ex. First name, Last name, Address, City, State, Postal code, Phone Number, Mail id, etc.
- Fill the data in according to the respective labels in a column, enter data one column at a time.
- Now after entering all the data save the file and close the sheet.

Step 2. File format using Microsoft Word
Now in this step, we are going to use an Excel file in Word. We have to make some file formatting using Word.
- Open Word file, in Word, go to files and select options.
- Now a new window is opened, select Advanced. Under Advanced select Confirm file format Conversation on the open option and click OK.

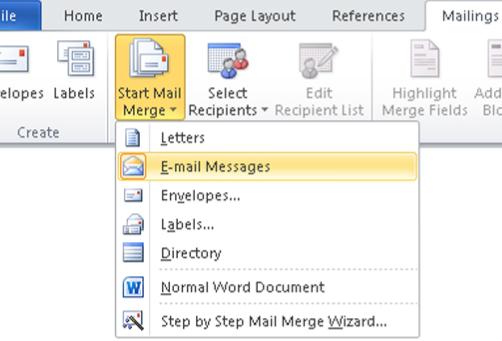
- Now in a blank Word file go to mailing and select start mail merge, under mail merge select labels.
- Now new window saying Lable options will open under that select labels vendor as Avery US letter and product number as 5160 Address labels.
Step 3. Connect Excel Worksheet to Label
- Go to the mailing tab and click on Select Recipient, under that click on the Use an Existing list option.
- Now select data source window will be opened, in this window navigate to the saved Excel file and open it.
- Now confirm data option will get appeared, click on OK.
- After again new window is opened saying Select table, in that window click OK to select your Excel sheet labels.
- Go to the mailing tab, Address block and select the format in which you need to recipient name.
- Now select match field from write and insert a field, select the column headings for required fields. Click OK.
- After the match field now goes to update labels and click OK the labels will be updated to the appropriate column.
Recommended Read: Mail Merge Excel to Word
Step 4. Finish and Merge
- To the end of the mailing tab, there is an option called Finish and Merge.
- Click on Finish and Merge options to see different available options. Now select Edit individual documents and select All and click OK.
- Now the new label document will be opened with all the mailing labels inserted in the required format now you can take a printout copy of these labels.
Conclusion
This brings us to the end of our tutorial on printing labels with Excel. If you like this tutorial, do follow QuickExcel for more such tutorials. We’re also open to feedback that you share. So please feel free to do so!
