In this article, we’ll learn more about auto fit in Excel. Errors like #VALUE! or ##### must have irritated you multiple times in Excel. There are different reasons for these errors and are meant to be handled differently, but uneasiness rises when after cross-checking the formula or method, the issue remains to persist.
Also, there are instances where the user requires to beautify the excel worksheet and make room for easier and clear content display and professionalism. Even to space out content or make cell size bigger both in length and breadth.
For all of this, be it issue rendering or beautifying of Excel worksheet, you may perform two things: Either make the row and column size bigger or smaller manually or resize them automatically.
Why to use Auto Fit?
When we resize cell size by changing Row Height or Column Width manually, we need to be very precise and careful as in this case, the user needs to increase or decrease Row Height or Column Width by entering numerical values in pixels or default unit which comes to perfection by a repeated hit and trial method.
| Type | Minimum Size | Maximum Size | Default Size |
|---|---|---|---|
| Row | 0 (hidden) | 409 | 15.00 |
| Column | 0 (hidden) | 255 | 8.43 |
But in order to make things easy, Excel provides a great feature that kind of automates this hassle. This is AutoFit Row Height and AutoFit Column Width.
Note: These two features are distinct and are their work is not dependent on each other.
Auto Fit Row Height
This Excel feature is used to auto-fit the cell’s height as per the content or value in that particular cell. It works on row order.
In most of the cases, user does not need to apply this feature manually, as whenever the value in a cell overflows in height from the default cell size, Excel is programmed smart and takes care of it, by automatically changing the Row Height.
Auto Fit Column Width
This Excel feature is used to auto fit the cell’s width as per the content or value in that particular cell. It works on column order.
This is a very important and helping feature of Excel as there are multiple scenarios in which the user needs to make use of this feature. As multiple times the values in a cell overflows the default size and there are chance of loss of information/value in the complete worksheet view.
How to AutoFit in Excel?
Follow these steps to applying the AutoFit feature of Excel in your Worksheet:
- Select the data cell or cells (row, columns) in which you want to apply the AutoFit functionality in your Excel Worksheet.

- Now, go to Format
For Excel Software version:
- On the Home tab, in the Cells group, click Format.
- Under Cell Size, click AutoFit Column Width or AutoFit Row Height for whichever you want to apply.

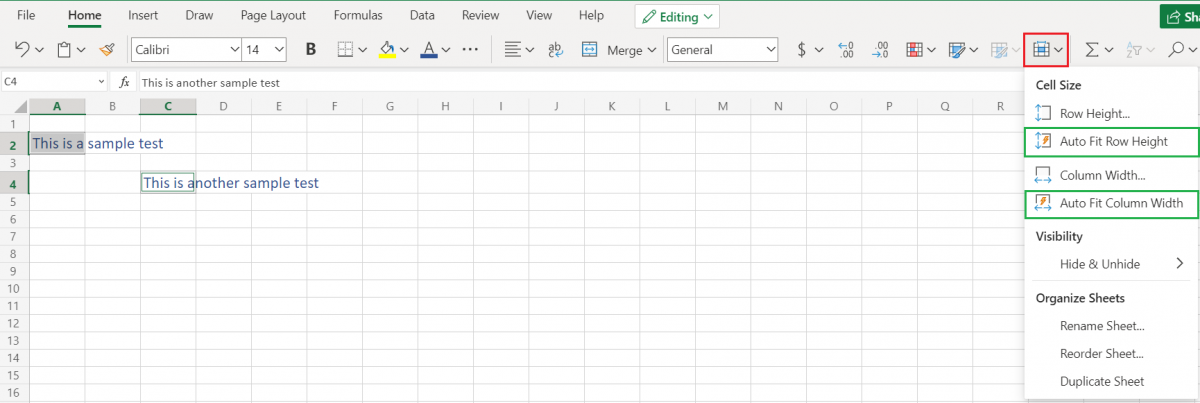
For Excel Web version:
- Go to the Home, in the Home tab
- Select Format (icon)
- From the drop-down menu click AutoFit Column Width or AutoFit Row Height for whichever you want to apply.

Your cell size for Row Height or Column Width or both is now Auto fitted as per the content/value inputted inside them.
The final data cell size of our sample data is:

Note: You might not notice any change when using AutoFit Row Height, as Excel by default applies auto fit Row Height for any content/value that overflows the default cell size in terms of Height.
Conclusion
That’s It! Hope you have learned that what is AutoFit, its benefits and how it is implemented in Excel.
Stay tuned and we will be back soon with another awesome Excel tutorial at QuickExcel!
