In this tutorial, we will master the Quick Access toolbar with which you can save, undo, redo, print, and do more to your Excel workbook.
We will illuminate other important functions and their shortcut keys to run them, and save time and increase productivity.
What is the Quick Access toolbar?
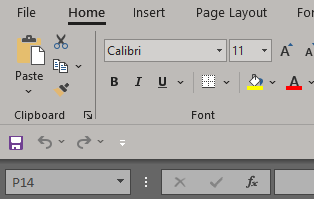
The Quick Access toolbar is a bar located in the top-most part, above the main tabs, in the Excel application.
You can find useful tools like Save, Undo, and Redo by default that we regularly use while working in any Office application.
Moreover, you can add more tools you frequently use in this ribbon by customizing it.
Steps to customize the Quick Access toolbar
To add more tools like Print or Mouse Mode or Touch Mode, follow the steps below.
- Open an Excel file.
- Hover the mouse pointer to the top-most part of the program.
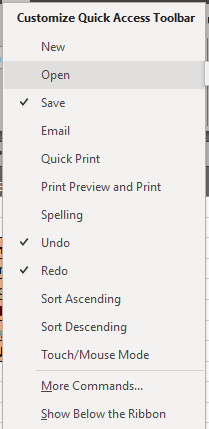
- Click on down-arrow to open a drop-down list.
- Choose a tool you wish to add to the toolbar.
- Uncheck the tools you want to remove from the bar.

You can see the several tools you can add to the toolbar to access them quickly.
- If you want to shift the toolbar below the ribbon, select Show below ribbon from the drop-down list.

If you want to add a tool that is absent in the drop-down list, follow the steps.
- Open the drop-down list by clicking the down arrow button.
- Click More Command in the list.
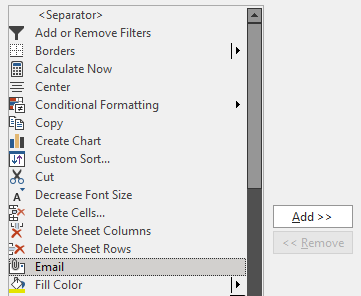
- The options window opens to add a tool in Excel in the Quick Access toolbar.
- If you cannot find the tools you want to add to the list, choose All commands in the Choose commands from box.
- Click on a tool you wish to add.
- Click Add in the middle.
- Click OK when you have finished.

Useful tools and their shortcut keys
There are many tools in Excel that we regularly use while working in a workbook. Some of the most commonly used tools are Save, Undo, Redo, Cut, Copy, Paste, and more.
It’s hectic and time-consuming to find and click on a button to use the command. It will be easier to use a shortcut key and get the job done. Most of the commands are similar to all Microsoft apps.
Let’s get started with some useful tools or functions that you might use regularly and learn their shortcut commands.
1. Save
- The Save option is available in the Quick Access toolbar above.
Shortcut
- Use CTRL+S on Windows and Mac to save a file after making changes.
2. Save As
To save a file in a new location in your system.
- Click on the File tab.
- Click Save As on the left.
- Choose a location to save.
- Click Save.
Shortcut
- Press F12 or Fn+F12 on Windows to Save As a file.
- Press ⌘+SHIFT+S on Mac to Save As a file.
If you are saving a file for the first time, pressing CTRL+S will be enough to Save As that file.
3. Select All
- Click on the triangle icon below the Name Box to select the entire worksheet.
Shortcut
- Press CTRL+A to select the entire sheet in Windows.
- Press ⌘+B to select all in Mac.
4. Copy a text
- Select a text or click on a cell.
- Go to the Home tab in a workbook.
- In the Clipboard section, click Copy to copy a text.
Shortcut
- Press CTRL+C to copy a text on Windows and Mac.
Copy a formula
- Click on the cell with a formula.
- Click in the formula bar with fx written beside.
- Select the formula and press CTRL+C to copy the formula.
5. Cut a text
- Select a text or click on a cell.
- Go to the Home tab in a workbook.
- In the Clipboard section, click Cut to cut a text.
Shortcut
- Press CTRL+X to cut a text on Windows and Mac.
6. Paste a text
- Select a text or click on a cell.
- Go to the Home tab in a workbook.
- In the Clipboard section, click Paste to paste a text.
Shortcut
- Press CTRL+V to paste a value on Windows and Mac.
7. Open a new workbook
To open an existing workbook from the device.
- Go to the File tab.
- Click Open.
- Choose from the list of files you see or click Browse if you cannot find the workbook you’re looking for.
Shortcut
- Press CTRL+O on Windows and Mac to open an existing workbook.
8. Create a new workbook
To create a new workbook in Excel.
- Go to the File tab.
- Click New.
- Select Blank Workbook or choose a template you like by clicking the More Template button.
Shortcut
- Press CTRL+N on Windows and Mac to create and open a new blank workbook.
9. Bold a text
- Select a text or click on a cell.
- Go to the Home tab in a workbook.
- In the font section, click on the capital B icon to bold a text.
Shortcut
- Press CTRL+B on Windows to bold a text.
- Press ⌘+B on Mac to bold a text.
10. Italic a text
- Select a text or click on a cell.
- Go to the Home tab in a workbook.
- In the font section, click on the capital I icon to italic a text.
Shortcut
- Press CTRL+I on Windows to italic a text.
- Press ⌘+I on Mac to italic a text.
11. Underline a text
- Select a text or click on a cell.
- Go to the Home tab in a workbook.
- In the font section, click on the capital and underlined U icon to underline a text.
Shortcut
- Press CTRL+U on Windows to underline a text.
- Press ⌘+U on Mac to underline a text.
12. Find
To find values in Excel.
- Go to the Home tab.
- In the Editing section, click Find & Select.
- Click Find to open the find window.
Shortcut
- Press CTRL+F to open the find window on Windows and Mac.
Read more here: [Detailed Guide] How to Find & Replace in Microsoft Excel?
13. Clear Values from cells
To clear values like texts, numbers, and formulas.
- Go to the Home tab.
- In the Editing section, pull down the Clear button.
- Click Clear Contents.
Shortcut
- Press Delete to clear contents from cells on Windows and Mac.
14. Undo
To undo or revoke recent changes made to a file.
- Click on the left arrow in the Quick Access toolbar in the top.
- This option will be visible only if changes are made recently.
Shortcut
- Press CTRL+Z in Windows and Mac to undo recent changes made to the file.
15. Redo
To redo recently undone changes.
- Click on the right arrow in the Quick Access toolbar in the top.
- This option will be visible only if changes are undone recently.
Shortcut
- Press CTRL+Y in Windows and Mac to redo changes made to the file.
Conclusion
This article was a detailed guide to learning the Quick Access toolbar and important tools and their shortcut keys. Hope this piece was informative to you. Stay tuned for more tutorials like this.
Reference- Wallstreet Prep.
