Date functions in Excel help you to simplify handling date operations easily. In this article, we’ll learn some of the date and time functions in Excel.
Date Functions in Excel
Let’s get started with the date and time functions offered by excel.
1. DATE function
The DATE function takes three separate values and combines them to represent a date.
Syntax: DATE(year, month, day), where year is a four-digit number corresponding to a calendar year, month is the month number from 1 to 12 (January to December) and day represents the day of the month from 1 to 31. The following example shows the use of DATE function:
- Select the cell where you want to display the result.
- Type =DATE(A2,B2,C2), where cells A2, B2, and C2 contain the year, month, and day respectively.

- Press the Enter key to display the result.

2. DATEDIF function
The DATEDIF function calculates the difference between two dates in terms of the number of complete days, months, and years in the period.
Syntax: DATEDIF(start_date,end_date,unit), where start-date is the first day of the period, end_date is the last day of the period, and unit can be “Y”, “M”, or “D”. “Y” for complete years, “M” for complete months, and “D” for complete days. The following example shows the use of DATEDIF function:
- Select the cell where you want to display the result.
- Type =DATEDIF(A2,B2,”M”), where cells A2 and B2 contain the start date and the end date respectively.

- Press the Enter key to display the result. 265 months have elapsed since 8/12/1999 till 9/23/2021.

3. DATEVALUE function
The DATEVALUE function transforms a text date into a serial number that Excel can recognize as a date. The formula =DATEVALUE(“1/1/2008”), for example, produces 39448, the date’s serial number is stored in the computer system.
Syntax: DATEVALUE(date_text), where date_text is the value whose serial number you want. The following example shows the use of DATEVALUE function:
- Select the cell where you want to display the result.
- Type =DATEVALUE(“9/11/2021”), where cell A2 contains the date.

- Press the Enter key to display the result.

4. DAY function
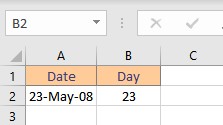
The DAY function extracts and returns the day from a date in Excel. The day is specified as an integer between 1 and 31.
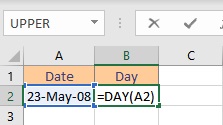
Syntax: DAY(date), where the date is whose day you want to find. The following example shows the use of DAY function:
- Select the cell where you want to display the result.
- Type =DAY(A2), where cell A2 contains the date.

- Press the Enter key to display the result.

5. DAYS function
In Excel, the DAYS function returns the number of days between the start date and the end date.
Syntax: DAYS(end_date, start_date), where start-date is the first day of the period and end_date is the last day of the period. The following example shows the use of DAYS function:
- Select the cell where you want to display the result.
- Type =DAYS(A2,B2), where cells A2 and B2 contain the start date and the end date respectively.

- Press the Enter key to display the result.

6. DAYS360 function
The DAYS360 function calculates the number of days between two dates using a 360-day year, which is commonly used in accounting computations. If your accounting system is based on twelve 30-day months, you can use this function to assist you to calculate payments.
Syntax: DAYS360(start_date,end_date), where start-date is the first day of the period and end_date is the last day of the period. The following example shows the use of DAYS360 function:
- Select the cell where you want to display the result.
- Type =DAYS(A2,B2), where cells A2 and B2 contain the start date and the end date respectively.

- Press the Enter key to display the result.

7. EDATE function
The EDATE function returns the date that occurs the specified number of months before or after the start date. It is used to calculate maturity dates or due dates that are the same day of the month as the issue date using EDATE.
Syntax: EDATE(start_date, months), where the start date is the first day of the period and months is the time period to be added to the date. The following example shows the use of the EDATE function:
- Select the cell where you want to display the result.
- Type =EDATE(A2,20), where cell A2 contains the date and 20 is the number of months to be added.

- Press the Enter key to display the result.

8. EOMONTH function
EOMONTH function returns the month’s end day, which is the specified number of months before or after the start date. It is used to calculate maturity or due dates on the last day of the month with EOMONTH.
Syntax: EOMONTH(start_date, months), where start-date is the first day of the period and months is the time period to be added to the date. The following example shows the use of the EOMONTH function:
- Select the cell where you want to display the result.
- Type =EOMONTH(A2,20), where cell A2 contains the date and 20 is the number of months to be added.

- Press the Enter key to display the result.

Conclusion
In this article, we learned some of the date and time functions in Excel.
