This article is a detailed step-by-step guide to creating a database in Excel. We will learn to create a database both manually and automatically using formulas and Excel options in detail in Excel.
Manually creating a database in Excel
You can either create a database using Forms or creating headings and put the appropriate data manually, one-by-one.
1. Creating a database using Forms (Recommended)
To begin creating a database using the Forms option, you must know how to insert the option in the ribbon first.
To insert the forms option in the Excel ribbon, follow these steps.
- Right-click in a blank space on the Excel ribbon.
- Click Customize Ribbon.
- Or, go to the File tab.
- Click Options.
- If you cannot the Options button, click on More and then click Options.
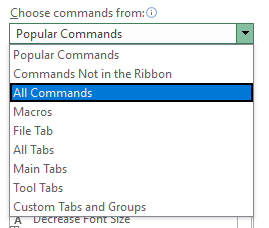
- Now, choose the All command in the Choose command from menu.
- Select the tab you want to insert the Form option.
- Or create a new tab by clicking New Tab below.
- Select the newly created tab.
- Rename the tab if you like.
- Now, scroll down until you find Form on the left.
- Click on the group under the newly created tab.
- Press Add in the middle.
- Click OK.

You can see that a new tab has been created in Excel.
Recommended read: How to Create Forms in Excel?
Let’s move to the further steps to create a database using the Form option in Excel.
- Select the cells where you want the headings to be.
- Press CTRL+T to create a table.
- The Create Table window opens to confirm if you want to create a table.
- Check My table has headers if you have already created the headers.
- Click OK.

You can see that a table has been created for you.
- Enter the headers by renaming the Column1, Column2, etc. fields.

We have successfully renamed the table headers in Excel.
Now, it’s time to add data to the table. Follow these steps below to quickly add entries in the empty fields.
- Click on a cell in the table range.
- Go to the Form tab that we created a few moments ago.
- Click Form.
- A window with the current sheet name opens showing a form.
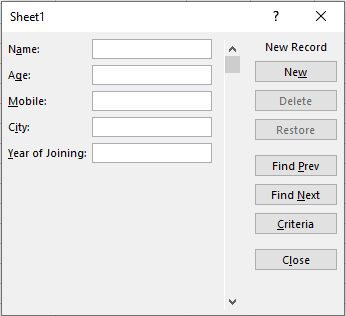
- You can see all your created headers in the form of fields here.
- Enter the details of the first person in all empty fields. For example- Enter a name in the Name field.
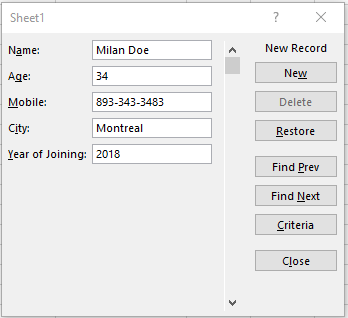
This is how you will enter the records one person at a time.
- Once you’re done, click New.
- Continue adding details of other people as well.
- Notice that every time you press New, those details are reflected in the database.
- Click Close when you have filled in all details.

Here is your mini database ready! Created using the forms option.
In case, you want to add additional data to the database, repeat these steps.
- Click on a cell in the table range.
- Go to the Form tab that we created a few moments ago.
- Click Form.
You will be able to enter new entries or alter existing entries in the table at any time in the future.
2. Generating random numerical database in Excel
If you want to create a large random numerical database in Excel, here are the steps to follow.
- Open an Excel sheet.
- Type the RANDBETWEEN formula in a cell.
- Type =RANDBETWEEN( and type the minimum number in the random data.
- Put a comma and type the maximum number you want to have in the random data.
- Hit ENTER.
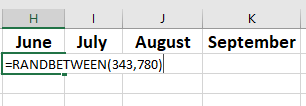
- Now, drag the cell vertically or horizontally from the bottom right corner until you see a plus sign.
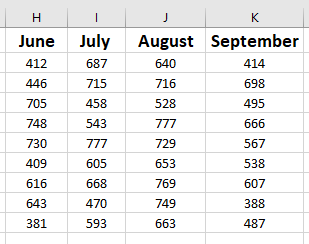
Note that these numbers are dynamic in nature. Meaning, the figures will change as soon as you make changes in the file. If you’re okay with it, it’s great. But if you want to stop the figures from changing, follow these steps below.
- Select the cells with the changing figures.
- Press CTRL + C or click Copy in the Home tab.
- Pull down on Paste in the Home tab and select Paste Special.
- Choose Values under Paste and press OK.

Try making changes in the sheet, and you will see that the values are no longer dynamic!
3. Creating a database automatically
This was probably something you were waiting to read or maybe the only reason why you came here.
Yes, fortunately, you CAN create a database automatically using Excel templates! Follow the steps below to automatically create a database.

- Open the Excel application on your system.
- Click on More Templates.
- Type “database” in the search box and hit ENTER. Make sure you’re connected to the Internet, or Excel won’t show results.
- Currently, there are two templates available under this search.
- We’re going for the Membership list template for now.
- Click on the template and click Create.

Edit the fields and headers as per your will in this automatically created database template.
Conclusion
This article was a detailed step-by-step guide to creating a database in Microsoft Excel. We learned to create a database both manually and automatically using formulas and Excel options in detail in Excel.
